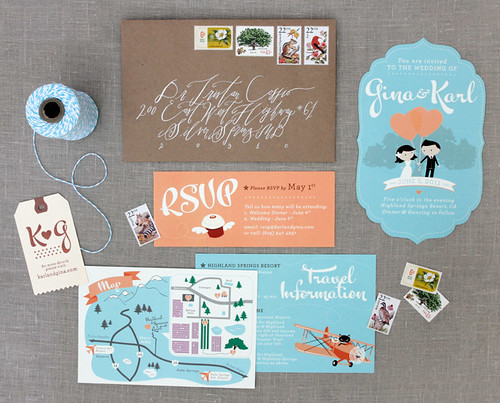
Showing posts with label d i y p r o j e c t s. Show all posts

Tuesday, 6 March 2012

first impressions + wedding invitations

The tradition of formally inviting guests to a wedding can be traced back through the centuries, but the method used has evolved quite a bit. For instance, historians note that in one of its earliest form in Old England, bidders announced the wedding celebration on the streets to passersby, inviting all to attend. In the 18th century, this progressed to people having their wedding invitations published in the local newspapers, while in the mid-19th Century, it is said that most couples had engraved wedding invitations hand-delivered to their guests.

http://kymerastudio.com/work/karl-gina-wedding-2/
|| Kymera Studio ||

One of the first impressions of a wedding begins with the invites to your guests. The chosen invites can really set the tone for the type of affair you are planning as well as giving the first glimpse of your special day to your guests. Also, so many couples like their wedding invitations to be a item that their guests will remember and perhaps keep as a memento. So it is important to choose stationary that will reflect a beautiful and stylist occassion.

Here are five key steps to remember when chosing your wedding stationary:
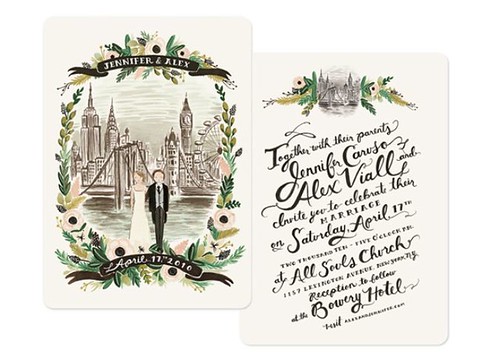
http://riflepaperco.com/index.php
|| Rifle Paper Co ||

1. What is the setting?

When you are choosing wedding invitations, it may help you to consider the setting of your wedding. Whether you are having a formal black-tie event or a more casual outdoor wedding, there are all sorts of invitations that can reflect that setting. With an array of stationary available for brides, there are options to really costomise your invites. For example, a hand-painted invite would make a great option for those marrying at a particular venue such as a manor, castle or popular location with an invite displaying a specific image of the venue itself. If you are a bride planning a casual wedding is given the freedom to be creative and have a stationary tailored to fit the style of your special day.
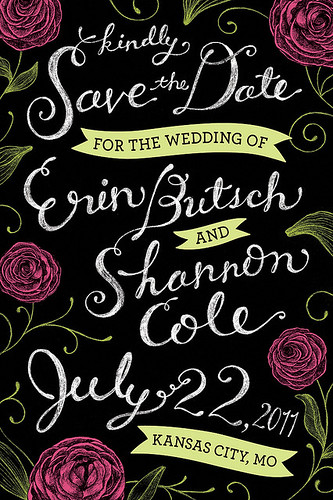
http://www.ebaddeley.com/
|| Elizabeth Baddelley ||

2. What are your colours?

Colouring is important. Again, this will set the tone of your wedding day so matching your wedding stationary is key. It will give your guests a lovely sneak peek and reveal a bit of your own personal taste and flair.

http://riflepaperco.com/
|| Rifle Paper Co ||

3. What is your theme?

I'm not talking fancy dress themes here. Although, I understand that is some couple's cup o' tea (if a star wars themed wedding is crossing your mind, for the love of wedding planning, please reconsider). In terms of themed weddings, this is more of a collaboration of your setting, chosen colors and style that you are going for. Are you planning a modern, simple yet stated wedding? Perhaps you are going for soft lace and a more vintage feel for a garden wedding? Regardless of what you choose, tailoring your wedding invite to the style of your wedding is very complimenting to your day. Try to incorporate textures that you are including in your wedding into your invite or even the design of your flowers.

http://thisandthatphotography.co.uk/

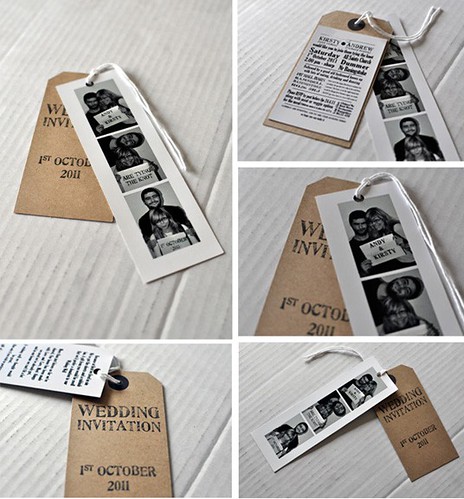
|| This and That Photography ||

4. Do you want photos?

Adding photos to your wedding invites is a great option for a fun and adventurous couple. Photo booth style photos are a sweet addition to an invite depending on the couple and their personalities. Couples can really have fun using photos and again set the tone for the type of wedding you are planning. Another option is to include a photo from your angagement photoshoot. This will make a great keepsake for your guests.

http://www.etsy.com/shop/bubbo

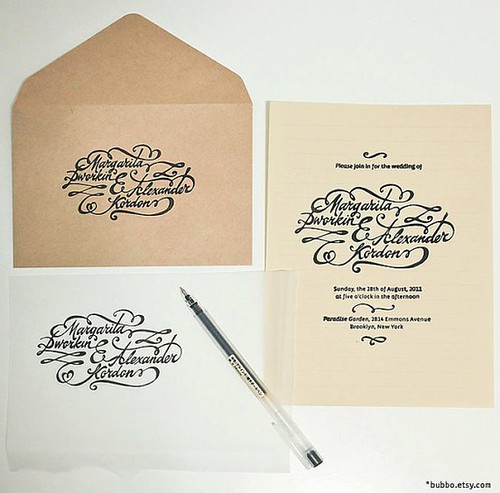
|| Bubbo Calligraphy + Typography||


5.What is your budget?

Wedding invitation can take a chunk from your budget. If you wonder what you should expect to spend on your wedding invitations, a lot depends on your budget, your taste and where you shop. Some experts say that you should allocate between 5 and 10 percent of your overall budget to your wedding invitations and related stationary expenses. This will greatly depend on your how much you plan to spend and the materials used. For instance, you might consider very formal engraved cards on the finest quality, heavy weight paper, or you may prefer an elegant wedding invitation with hand-pressed flowers. Regardless, of which is your chosen style, when choosing your wedding invitations, you also should consider the budget you have. Many couples are turning to Do-It-Yourself kits, which offer all of the pieces you will need to print your own wedding invitations at home and put them together yourself. While the price for this more creative approach is often comparable to some of the more basic professionally printed cards, by going it alone you can greatly up the quality of the materials you select without spending more than you can afford. My advice is the 'less is more' approach when creating your own invites. Keep it simple and elegant (put down the glue gun!) such a letter-press detailing, typography or hand stamped lettering and a candle wax seal. Your guests will appreciate the sentiment.

Sunday, 26 February 2012

easy peachy

We get questions from brides quite a bit on how one might go about creating something special, inexpensive yet memorable to use as table place cards. There are ideas spilling from the woodworks using amazingly creative ideas so we thought we would our favorite with you.

Continuing with a peach theme {yes, we are slightly hooked!} Perhaps it is the constant wishing of springtime to arrive in London as it is our absolute fave and we are a bit tired of the greyness this town brings during the winters.

What better way to display place cards by using peaches? We are after all southern belles so it is definately a no brainer!

It is easy peachy and just about anyone can make these. Here is what you will need:

P e a c h y T a b l e P l a c e C a r d s


A hand selected pick of lovely fruit. Preferably ones that match your color scheme or will add a lovely bit of color

Place cards. You can cards that are already made or create your own. We have cut out squares and use a rounded punch to tidy the corners.

Get to stamping! Find some lovely wooden stamps or clear mountable stamps (we prefer these as you can see what you are doing much easier!)

Two way tacks. Smaller ones can be found in most scrapbooking section of your craft store or you may find gold ones in the section where stationary supplies are sold.

Enjoy adding a simple yet lovely touch to your day. Guests are sure to be impressed.

Sunday, 19 February 2012

e a r l g r e y + m a c a r o n w e d d i n g b l i s s

We are doing it. We are totally jumping on the macaron band wagon when it comes to including amazing treats for guests at weddings. Whether it is a designer cake of towering macaron french goodness or a delicate gesture of tiny boxed earl grey macarons, your guests are sure to find your sentiment delightful. Perhaps you do not have patiseries near yet, may be slightly savvy in the kitchen? Why not try your hand at making them yourself? You'll be pleasantly surprised. Trust me.


{photo cortesy of Robert and Kathleen Photographers]


I'd always read about macarons in Enid Blyton's books but it wasn't until until my first encounter at Ladurée at Harrods in London that I fell in love with them. Since, I've been to various shops (there are many near me here in London) that sell these sublime delicacies. I'm not sure whether it's the beautiful crisp shell that bursts into the light chewy centre or the stunning display of macarons in full range of colours. I have a slight addiction to all things earl grey. From perfumes to sweet treats. My next tasting adventure will be to taste the delicate Earl Grey tea chocolate from Pierre Marcolini which I totally missed on my last trip to Belgium.


I came across this macaron receipe from Ottolenghi’s cookbook. They always have these amazing giant meringues in their window and I figure they can’t go too wrong with their macarons. This recipe is definately worth a try.

Base recipe for macarons

110g icing super
60g ground almonds (or almond meal)
2 free range egg whites (60 g)
40g caster sugar
2 tablespoons of ground earl grey tea leaves

Chocolate ganache

250g double cream
250g Greenbecks chocolate 66% cocoa (dark chocolate) chopped roughly
50g unsalted cold butter
4 tablespoons earl grey tea leaves


Heat up the oven until 170 degrees Celsius. (If your oven tends to overheat a bit, I would take it down a notch to 150 or 160 degrees Celsius because you don’t want your macarons to burn without the inside cooking.)
Sift the icing sugar and almond meal together. You can either use the almond meal, or grind it down finer so that it gives the macarons a finer texture.

Place the egg whites and caster sugar in the bowl of a freestanding electric mixer (that is, not a handheld one) and start whisking at full speed until the whites have formed a thick, aerated meringue. Don’t overbeat the egg whites, you want soft peaks rather than stiff peaks.

Take a third of the meringue and fold it gently into the sift almond and icing sugar mix. Once incorporated, add another third of the meringue and continue similarly until all the meringue has been added and the mix appears smooth and glossy. Don’t worry if you have knocked some of the air out of the batter, that’s the way it should be, it should be deflated by this point.

Take a sheet of baking parchment and “glue” it onto a baking tray by dotting the tray in a few places with a tiny amount of macaron mix. Using a piping bag and a nozzle around 1 cm, pipe small rounds of macarons mixture onto the tray spaced apart.

The macaron mixture will spread a little, and then rise as well. You can make them as little or as big as you like. Mini ones are actually pretty cute! Ottolenghi has a good tip which is to draw circles onto paper to help keep the sizes consistent.

Now hold the tray firmly and tap the underside vigorously. This step is quite important - it should help to spread and smooth out the biscuits.

Leave the macarons out and uncovered at least 15 mins before baking. This is apparently to give it a nice “skin” on the macaron which will be the nice glossy shell.


To bake, place the macarons in the pre-heated oven and leave for about 12 minutes. They may take a bit longer, depending on your oven. The macarons are ready when they come freely off the paper when lifted with a palette knife. Remove from the oven as soon as they reach this stage, so you don’t overbake them and leave aside to cool completely. Don’t remove the macarons from the paper until it has fully cooled, otherwise it will break easily.

While the macarons are cooling, you can make the Earl Grey tea chocolate ganache.

Place the chocolate in a metal bowl which is large enough to sit comfortably over a saucepan of simmering water without the base touching the water. Slowly melt the chocolate, stirring steadily.

In another saucepan (preferably at the same time) heat up the double cream with the Earl Grey tea leaves over medium heat.

Let the tea leaves infuse into the cream until the cream is a lovely milky tea colour. The cream will taste quite bitter but it will be balanced by the chocolate and the macaron.

Strain the double cream and slowly mix into the melted chocolate. Stir until the cream has been mixed into the chocolate.

Add in the butter and stir, you can either use a hand blender or mix by hand. Apparently using a hand blender you end up with a more glossy ganache!

Pop it into the fridge to cool until it firms up a little so that it is easier to pipe into your macarons.

To assemble the macarons, pipe the ganache onto the flat side of half the biscuits. Sandwich them with the other half, squeezing them together. Leave at room tempeture to set within a couple of hours.

Macarons are best served at room temperature.